Pages

Wednesday, November 10, 2010

Vintage Mini Album and Stand I received in a swap.


vintage mini album and stand 003vintage mini album and stand 002

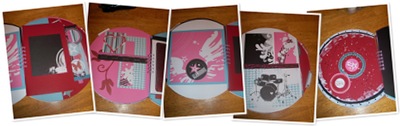
This beautiful mini album and stand I received from my friend Fred. We had decided over the summer to do a mini album swap. She wanted a country theme mini and I wanted a vintage. When I opened the package I was in total shock! All I could say was “Oh my gosh” over and over again! Hubby thought there was something wrong ( LOL!), but when I showed him he was also saying “ Oh my gosh”! Funny thing is I didn’t even open the mini yet, I was just looking at the stand and the cover of the mini. So you can imagine what I was saying as I flipped through the pages!  Now here are the pics of the inside of the mini album……..

vintage mini album and stand 004

vintage mini album and stand 005

vintage mini album and stand 006vintage mini album and stand 007vintage mini album and stand 008vintage mini album and stand 009vintage mini album and stand 010vintage mini album and stand 011vintage mini album and stand 012

vintage mini album and stand 013

vintage mini album and stand 014

vintage mini album and stand 015vintage mini album and stand 016vintage mini album and stand 017

This is the back of the stand and mini album.

Now for some instructions on how to make this album and stand:

To make the stand you will need 2 books and some wood blocks ( She used old wood mount stamp blocks). You are going to have to tea dye the books. Glue only the edges of the pages in the books. Paint the outside of the books if you don’t like the color. Now get some elmer’s school glue. If you want small cracks just add a tiny bit of water to the glue and paint it on the books. If you want large cracks add more water to the glue. Let it dry just a little bit, and paint on another color over top the glue. Let it air dry. When it is completely dry take some brown cream shoe polish and rub over the crackle finish. let the shoe polish cure. Spray with a sealer.

Now to make the mini book holder and mini book. You will need another hardbound book. and do the same process as above. Except: Open book in the middle. Divide the pages in thirds. glue each section of pages together close to the edge of the pages. Glue the next set of pages together, and so on. So now on one side of the book you will have 3 pages. To rough up the edges of the pages you can use an old pair of scissors. Also you can curl, roll, and tear pages to get the distressed look. On the other side of the book you are going to trace the shape of your mini album on the first page and take an exacto knife and start cutting through all the pages. Before you glue the pages together make sure your mini album fits in the cut out. Make your adjustments before you glue the pages together. Glue the base together ( the first 2 books)  Now you can decorate and embellish the other book and mini to your liking. Set the mini and book on top of the base and figure out where the wood blocks should go. You want the mini album to rest on one of the blocks.

I hope this helps! If you have any questions just leave it in the comments.

Also I am attaching the video I made so you can see more details on this beautiful creation.

Vintage mini video


Hope you have a fantastic rest of the week!

Patti

Monday, August 30, 2010

Graphic 45 Steampunk debutante project

Hi again!

I have altered an outside light for inside use. I am planning on getting a battery operated candle for the inside.

I have pictures of just the lantern part. Graphic 45 Steampunk project 002 

This is one of the sides.

Graphic 45 Steampunk project 003

The back.

Graphic 45 Steampunk project 004

THe other side.

Graphic 45 Steampunk project 005


The front.

Graphic 45 Steampunk project 006

The Top.

Graphic 45 Steampunk project 007

If you would like to see it all put together check out my video……

Have a Great day!

Patti

Sunday, August 29, 2010

A Country Mini album for a swap

Here is a video on a mini album I made for a swap.

Fairytale Party Favors

Hello Everyone!

I thought I would share with all of you the party favors I made for my daughter’s birthday.

bre's birthday 2010 004

The little mini albums were made from one sheet of cardstock.

bre's birthday 2010 005 

The boxes were cut with my cricut using the Tags, bags, boxes and more cart.

I used DCWV “Once upon a time” paper on both projects.

They were so fun to make and it only took me 3 hours to make the albums and the boxes! I love fast and easy projects!!

Have a Great week!

Patti

Saturday, July 10, 2010

Coffee dyed paper and a new use for alcohol inks!

So I thought I would share with you a video I made. I use coffee to dye paper for an antique look, and I found a new use for alcohol inks.

My Hubby had a massive heart attack last month and he is now feeling better, so I am back on track with my crafting and will be posting more often :)

Take care and have a great weekend!

Patti

Thursday, May 27, 2010

Your Paper Pantry Journal Me This Collage swap

Hi My Blogger Friends,
Today I thought I would share with you what I made for my swap partner for the Journal Me This Collage swap on Your Paper Pantry.


Wednesday, April 7, 2010

Puffy paint textural technique

Hello again! I found out that puffy paint and metallic paint when heated with a heat gun creates a really cool texture(I was a little inpatient waiting for paint to dry ). So I made another video to show how to do this cool technique.

Hope you all enjoy and try this technique out yourself!

Hugs

Tuesday, April 6, 2010

Faux metal technique


Hi my bloggie friends! I thought I would share a technique with you all:)

Part 1


Part 2


If you have any questions just give me a holler on my e-mail or leave a comment.

Hugs

Saturday, March 6, 2010

All Day Crop

A few weeks ago I attended an all day crop. You would have thought I got a lot of stuff done, but it was not the case:( I kept on getting calls on my cell phone.. (Note to self: shut phone off at the next crop!) I did get 1 two page LO done and I did work on a few mini albums though. So here is a few pictures of the crop. The first one is of a 2 friends working away. Notice they are sharing a table…

021

Now, look at all my stuff, I took up a whole table myself and some!

022

and here is the LO I did manage to get done……

scrapbook stuff 038

These pics are from when my girls were little. I am trying to get all their pictures scrapped before their graduation party. I would like to display their albums at their party. I hope I get them all done by July!

Vinyl Record album

This album I made out of 2 vinyl records. I bound it with my bind it all. Boy o boy was that a trial and error process. The vinyl record kept on cracking when I went to put the binding holes in, but I did finally figure it out! You have to run the record under really hot water to soften the vinyl before you punch the holes. Anyway, this album is for my daughter to use for her senior year in high school. I have to make another one for my other daughter yet…I did leave some blank pages for my daughter to decorate herself.

Shutter Fold Mini Album

I know I have been MIA:( but I have been working on a lot of stuff. I am finally getting around to posting all my little projects:)

So, I made this mini album for my Hubby for our Anniversary. He does not know that I have some of these old family pictures. What a surprise for him when I showed him the album!

scrapbook stuff 002 scrapbook stuff 003 scrapbook stuff 004 scrapbook stuff 005 scrapbook stuff 006

scrapbook stuff 007 scrapbook stuff 010 scrapbook stuff 008 scrapbook stuff 011 scrapbook stuff 012

scrapbook stuff 014 scrapbook stuff 013 scrapbook stuff 015

I still have some journaling and embellishing to do, but the majority of the album is done!

Friday, January 8, 2010

Ithaca Layout

So here is the first official page for the puppies album.Yes the dogs have their own albums…… I am not weird, they are also my children and deserve their own albums just like the human children. Anyway here it is.. Da Ta  Da  Da!!!!!

004

Happy Scrapping Everyone!

2010 Inspire Project #1

If you read my recent post on my word for 2010, then you know that my word is “Inspire” so here is my Inspire Creativity project.

This is the cupboard that I see while I am scrapbooking and crafting. So I thought I would spice it up with a little inspiration.

Inspire project 1 001

Sorry about the crocked picture taking skills I have, and the flash glare…

I cut the letters out of some vinyl with my cricut machine. Then I had all these paint chips laying around that I never use. I have been collecting them for awhile thinking that I will come up with a fabulous project to use them on ( It hasn’t happened yet). Aren’t the crayon paint chips just toooo cute!!!!! I just taped them up on my cupboard with scotch tape. Which means I can change it up really easy! Then I went on the web and found some texture images, printed them out, and stuck them up too. Now I have textures and colors to look at instead of white! I am sure though I will probably change all of it except the words often because I like change. You can ask my Hubby! He is quit sick of me rearranging the furniture because I make him move the heavy stuff. Anyway, I hope that this INSPIRES you to pick your word for 2010 and display it in a creative way. Next week I will post another display I am working on. Hope you all have an inspirational weekend:)