Pages

Sunday, July 15, 2012

Cheval Mirror Mini Album Stand

Hi Again!
I have created a new template and it is available at www.thealteredmusestudio.com
Wouldn't this look awesome on a coffee table or end table! 
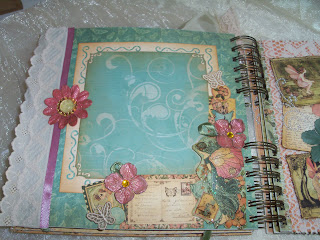
Here are some pictures of the inside of the mini album.....
Page 1- Photo mat with stamped image and
Page 2- Tag and Frame page

Page 2- behind the tags is this frame

Page 3- Photo Mat with handmade flowers
Page 4- Tags and Frame page

Page 4- behind the tags is this frame

Page 5- Photo Mat page
Page 6- Pocket and tag page

Page 6- Behind the tags is this 3 tiered pocket

Page 7- Photo Frames page
Page 8- Envelope Pocket and tag page

Page 8- Behind the tags are these cute little envelopes that hold the tags

I have made kits for the mini album part of this template. Everything you see is included in the kit including the Graphic 45 A Ladies Diary paper. I only have 2 kits left. If you would like to purchase this kit or get more info you can visit   http://www.thealteredmusestudio.com/p/kits.html

Have A Very Creative Week!


Monday, July 2, 2012

The Altered Muse Studio

I have created an Altered Artist Community The Altered Muse Studio (that's the link) Come and join me and sign up for the site! We will be having a virtual crop on Saturday, July 7th starting at 7 pm EST. You can find the crop event under the EVENTS tab at the top of the home page! Make sure you RSVP!!! We have lots of fun groups up and we will be adding swaps soon!!

Sunday, June 10, 2012

Cabinet made from a cereal box

Hello Everyone!
I made this beautiful cabinet out of a cereal box! Yep, you read that right, a cereal box!
Here is the front of the cabinet


The paper I used was the Butterfly Garden paper from Pink Paislee. The bling is from Want2Srap and the butterfly is from Michaels Recollection collection. The knod is a wooden wheel that I painted pearl white. 
Here is the inside of the cabinet.....


I will be doing a live Ustream Show on how to make this cabinet on Saturday, June 16th at 8pm. EST. If you would like to know step by step how to make this cabinet please join me on Saturday

Have a Great Week!


Wednesday, March 7, 2012

Altered Display Book Ustream Class

Hello Bloggers!

Please come and join me while I take you through a step by step journey on how to create a Altered Display Book of your own! These books make an elegant conversational piece for your home and make a great gift for someone special! This will be a series of 4 bi-weekly classes and you will continue to work on each phase between classes. With the skills you learn in these classes you will be able to create many different styles of Altered Books and change the layout with confidence! The cost of the class is $54 and includes 4 bi-weekly classes a invite to a private group where you can ask questions, chat with other classmates and myself, download the template available, and watch the extra videos I will be posting. You need to become a member of Create, Share & Inspire to sign up and take part in this class! You can join here http://morepaperthanshoes.ning.com/

Here is an example of what we will be creating.......

I Hope to see you in class!
Hugs♥
Patti

Monday, January 23, 2012

Ustream Class Project


I taught my first Ustream class called “Creative Collage Madness” on Saturday! It was my new and exciting challenge for 2012. Here is the project that I did in class….
Ustream Class Project 003
and here is the example collage I made so everyone would know what the class was about…..
Collage Project 001
If you would like to see the class I did record it and you can view it anytime here.I shared some great techniques in the class! The live class was for the members of Create, Share, & Inspire Ning site. I have been sharing the responsibilities of this site with the original creator of the site Anna Fearer from More Paper than Shoes. We have joined forces to make the site fun and exciting for all the memebers. We have lots of swaps and challenges going on! You can join the site here. I will be doing another Ustream class soon, so if you would like to see it live and join the fun make sure you goin the Ning site!
I hope everyone has a Happy Crafty Day!!
Patti 

Wednesday, November 9, 2011

Guest DT project for Paper Hoarders

Hi Beauties!
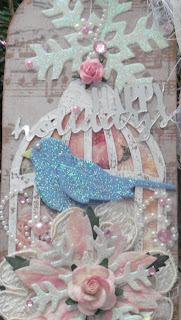
This is my last month of being a guest design team member for Paper Hoarders group. This month I had to make a Christmas tag. Here is my project:
close- up

Shabby Chic Christmas Tag
The first thing I did was cut out the tag using Tags, Bags, Boxes & More Cricut cartridge at 6 inches. I just cut the tag out of cardstock first and then out of my decorative paper. I used the Tim Holtz Kraft Resist Paper and inked it with a white ink pad then I sprayed the paper with Lindys Stamp Gang Starburst spray in Cotton Candy Pink. The snowflakes I cut out of the K& Co. Deck The Halls Silhouettes paper that I had in my stash for forever. The birdcage and bird are a Tim Holtz die cut for sizzix. I painted the birdcage with a rusty brown color paint that I mixed up first, then I painted crackle medium on it, and finally I painted white paint over top and waited for the crackling to appear. The bird I painted blue and then used waterfall stickles to make him sparkle. The mulberry flowers are from Wild Orchid Crafts including the poinsettia. I used the starburst spray again and a paint brush to make the flowers two-tone. At the bottom of the tag I layered cream and white lace. The Happy Holidays was also cut with my cricut using the Jolly Holidays cartridge and cutting it at 1 inch. I also added some bling and pearls to spice it up. Just remember you don't need to use Christmas theme paper to make Christmas tags or other craft projects!  If you would like to create a Shabby Chic look to any of your projects just remember to use pastel colors, lots of lace, flowers, bling and pearls. 
Thank you Tanya for letting me be a guest Designer on Paper Hoarders! I had lots of fun creating all my projects!
I hope you all have a Happy Crafty Week!
Hugs
Patti

Sunday, October 30, 2011

Ornament Swap on Ooh-la-la Vintage Treasures

Hello Bloggers,
I know I have been MIA, but it seems that I keep on forgetting to do posts on my personal blog. As you all may know Doreen and I have a store called Ooh-la-la Vintage Treasures. We also have a blog that we have started to host swaps on. Right now we are hosting a Holiday Ornament Swap! There are 3 style groups: Shabby Chic, Vintage, and Shabby Chic-Vintage mixed group. We would love it if you all could come and join  us! Sign- ups are until Nov. 7th and the ornaments are due to be mailed out no later then Dec. 10th. Each group will have 6 people and you will be responsible for making 5 ornaments. If you would like you can make 6 so you can keep one of your own creations. All the details are here and I did a video on some ideas as to what you can use to make your ornaments here. we do ask that you do not use the plastic bulb ornaments because they do not mail well in a bubble envelope. To sign up please email me so I can send you my address so you know where to mail the ornaments when you are done and make sure you tell me which group you would like to be in. My email address is creativepatti@gmail.com
Also.........
We are working on a huge blog event called The 12 Days of Christmas. It will take place Dec 1st- 12th. We are looking for some creative people to participate in this event. The categories are Christmas Decor ideas & tips, craft ( including kids crafts), gift ideas, and creative baking. All the projects should be in a vintage or shabby chic style except for baking and kids crafts. All you would have to do is either do a video and send me the link so I can post it or you can create a blog post with pictures and all the How to info and email it to me. You can also post on your own blog or YT channel, but you need to make sure the link to Ooh-la-la Vintage Treasures blog is in your post or description. We will be having a daily giveaway that all our guests can enter a chance to win. You do not have to use only Ooh-la-la products, but we do ask that you not mention other stores because we are trying to make this neutral so our guests do not feel they have to shop at certain stores. You can say from my stash or from my local scrapbook store. If you are interested in joining us please email me with the category you would like to represent and the date you would like it to post. My email is listed above.
I hope you all can join us either in the swap or The 12 Days of Christmas Event!
Have a Great Week!
Hugs♥
Patti

Friday, September 16, 2011

Template Store Page

Hello Beauties,
I have added a page to my blog. Yep, you can now buy my templates straight from here! Now you don't have to jump around on the net looking for the templates. If you look above under my banner you will see the tab " Template Store" all you have to do is click on the tab and start shopping! I hope this makes it more convenient for you! Just remember all the templates are emailed to you with a assembly instructional video link. There is no download button because of the assembly videos. Please allow at least 24 hrs for the template to show up in your email. I do on occasion have a ton of orders and I send them in the order they come in. So now hop on over and check out the Template Store and let me know what you think!
Have a Great Weekend!
Hugs♥
Patti

Wednesday, September 14, 2011

Paper Hoarders Guest Design Team Member Project

Hello Beauties,
I am so honored to be a Guest Designer for the Facebook Group Paper Hoarders! Our challenge was to use fall colors and a ruler. So I decided to make a much needed fall Welcome sign for my front door. I have been making these signs for years using door panels from old doors. They are super easy to make and fun too! They also make great gifts:) So without further ado here is my fall Welcome Sign
Here is what I did and a supply list:
First I painted the wood with watered down brown craft paint. The wood panel was raw wood and I wanted more of a stained wood look that is why I watered down the paint. When the paint dried I lightly sanded it for a more distressed vintage look. I then used metallic gold craft paint as a kinda rub. I put the paint on a paper towel and lightly rubbed it all over the wood panel. After letting it dry I took some Linen colored paint and a sponge and lightly dabbed it in random places. I did a final sanding on it and then I attached some burlap to the panel part with modge podge. I got some fall color flowers and picks from Dollar Tree and Michael's and started working on my sprays for the 2 corners. I just played with them till they looked good. I cut the letters and apples out with my Cricut using the Plantin Schoolbook Cartridge and attached them with Modge Podge to decorative paper ( not sure what paper line this paper is from). I actually raided my scrap paper bin :) I covered both sides of the paper with Modge Podge to protect it from the weather. I then used some plaid ribbon from Webster's Pages and attached it to the back of the paper with Fabri-Tac glue. On top of the plaid ribbon ( but not completly covering it) I added a tape measure ribbon ( Sold out in my store right now, but will be getting more in soon) and under the tape measure ribbon I added some tea dyed eyelet ruffle trim. I attached the apples and the bird ( from a K & Co die cut pack) with Modge Podge. Before attaching the flower sprays I used Modge Podge to seal the wood. So there you go, now you can make your own beautiful sign for your home!
Have a Happy Crafty Day!
Thank you for stopping by,
Hugs♥
Patti

Sunday, September 4, 2011

10% off every item sale at Ooh-la-la Vintage Treasures

Hello Beauties,
There is a sale going on at Ooh-la-la Vintage Treasures! 10% off every item in the store. The prices are already in effect and all you have to do is add the item to your cart. The sale ends Tuesday 12:00 am. So, what are you waiting for go check out the sale here !
Have a Great Holiday Weekend!
Patti

Friday, August 19, 2011

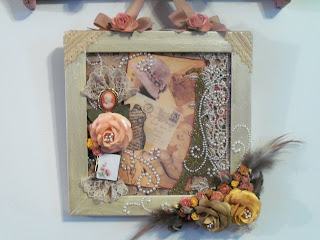
MPTS 1st. Blog Hop : Parisian Wall Hanging project

 This is "More Paper Than Shoes" first blog hop!  There will
be a huge giveaway too on Anna Fearer's blog!
 
 Hello My Friends,
 This is my first time ever participating in a blog hop and I am really excited! I just recently moved and I now have my very own craft studio ( I used to craft in my bedroom in my old house). So I decided to create something for my new room to hang on my kinda bare walls. I altered a frame and made a wall hanging . I do have to say Anna's flowers are just amazing to work with! I received the shades of yellow collection from her. I did add some shimmer to the flowers with my Lindy's sprays.The image I used was found in my stash of goodies and it worked out perfect for this! I cut a piece of heavy duty chipboard to fit inside the frame. I then added some of my shabby chic fabric and some lace to the piece of chipboard.  I cut an Eiffel Tower with my Cricut and covered it with gold German glass glitter, then added some pearl swirl bling over top. The old jewelry pieces I added were from my stash of pretties! The cameo came from my friend Doreen. I used a ton of lace because I ♥ Lace! Yep, I am a vintage shabby chic girl!


Here is the list of items I used to create this wall hanging:
1 Frame
Paint
Lace ( lots of it)
Ribbon
Anna's flowers
Pearl swirl bling
Mulberry flowers
An image of your choice
Old jewelry pieces
Feathers
 1 Eiffel Tower die cut
Gold German glass glitter
A piece of fabric
Heavy duty chipboard cut to size
Beacon Fabri-tac glue ( the best glue ever!) 
 
Thank you so much for stopping by and visiting my blog!
I hope you all have a Happy Crafty Day!
Hugs♥Patti
Your next stop is Angela , go see what beautiful project she made with Anna's flowers! Don't forget to leave a comment and follow each blog hop participant to get you name added to the giveaway on Anna's Blog! Also, Anna is having a sale in her store here is the coupon code for 15%off mptsbloghop
See what these
talented ladies design using MPTS flowers from the store!

Blog List:

Anna -
http://www.annafearer.blogspot.com

Patricia - 
http://pattyandcharlie.blogspot.com

Marlene - 
http://uniquelyella.blogspot.com

Charlene -
http://lifeissogood495.blogspot.com

Kristen -
http://huneebcreations.blogspot.com/

Doreen -
http://mybedazzledtreasures.blogspot.com/

Patti -
http://scrap-happinings.blogspot.com/

Angela -
http://theblingtheory.blogspot.com/

Juliana -
http://iluvvintagescrap.blogspot.com/

Wednesday, August 17, 2011

Altered Thread Spool

Hello My Friends,
I made this altered thread spool for a challenge in one of the groups I am in. The challenge was to alter something round, so I gazed around my craft studio and my eyes rested upon this large thread spool. I know that about 8 months ago altering thread spools was totally the fad in the craft world, but I am just getting around to altering mine, lol! I made my thread spool to hang from my shadow box shelf ( it has pegs at the bottom).


I wrapped the spool with pretty paper and then added a vintage wedding dress applique to the front with some mulberry roses.


On the top of the spool I took 2 of the fan buttons ( a Walmart find) cut the shanks off, added some ruffled lace in between with the ribbon for the hanger, and then glued the buttons together back to back. I added some mulberry roses and pearls spray around the bottom of the fan buttons for an added touch.
 

On the bottom of the spool I added the charm instead of a tassel. The charm I received in a swap and it went perfect with this lil crafty project! Of course, I added some lace to the bottom rim kinda giving it a lace skirt.
 
I just love how my thread spool turned out! It looks absolutely adorable hanging off my shelf!

Make sure you stop back on Saturday, August 20th because I am participating in a blog hop! There will be an awesome giveaway too!!!
Thanks for stopping by to visit me,
Hugs♥
Patti 


Monday, June 6, 2011

Lollipop peony flower tutorial


I thought I would share with all my blogger friends this flower tutorial:) I will be doing a tutorial on another flower later this week and I promise I will share with you all!

Have a creative day!
Patti♥

Monday, May 16, 2011

New Grandson's baby album

Helloooo Bloggers,
My 1st. Grandchild arrived last week! Camden James Lee Carrow arrived Tuesday, May 10th weighing 7lbs. 10 1/2 oz. So, for awhile now I have been working on a baby album for Camden's Mommy. I used the Graphic 45 Once Upon a Springtime paper and lots of creativity. Anyway I though I would share the baby album with you all:) Warning there are a lot of pictures!

                                                     
Front Cover

1st. page

Baby birth story book that fits in the pocket

1st page without the Birth Story book

2nd page

3rd. page is a flip book

Inside cover and opposite page of flip book

Tag from pocket page of flip book

3rd. page of flip book

4th page of flip book

5th page of flip book

last page of flip book

4th page of album

5th page of album

6th page of album (pocket page)

front side of photo mats from pocket page

back side of photo mats from pocket page

7th Page

8th page

9th page

last page!
Whew! I told you there were a lot of pictures! Thank you for sticking with me:)
Have a creative week!
Patti♥

Wednesday, May 4, 2011

Window Shadow Box

Hello Again!
I have created a window shadow box that is just so shabby chic delicious!
The little girl image I found on Google images and I thought she looked like she was daydreaming. I crackle finished the window and distressed it with TH weathered wood and vintage photo distress ink. For the background I used some vintage book pages, tea dyed paper doily, some cut images out of the Webster Pages Country Estate paper, a little touch of Frogfeathers trim,  a few buttons, heart charm, and lace. I made a bird nest for the sill out of twine and a few beads for eggs. The vines on the shutters are an old sizzix die, roses are from Wild Orchid Crafts, and the birds are K&Co. If you want to make one of these window shadow boxes you can get the template here.


Have a creative week!
Patti